If you walk into a room and flip the switch, but the ceiling fan light doesn’t turn on, it’s more than just a small inconvenience. Good lighting is essential for daily tasks, safety, and mood. When your ceiling fan light is not working, you may feel frustrated or unsure where to start. The problem could be simple, like a burnt-out bulb, or more complex, like a wiring issue. This article is your complete guide to understanding, troubleshooting, and fixing a ceiling fan light that isn’t working. Whether you’re a beginner or have some DIY experience, you’ll learn step-by-step solutions, safety tips, and practical advice to restore your lighting and comfort.
How Ceiling Fan Lights Work
Before troubleshooting, it’s helpful to know how these lights function. A ceiling fan light is usually powered by a separate circuit within the fan. This means the fan’s motor and the light can work independently or together, depending on wiring and controls.
Some fans have pull chains, while others use wall switches or remote controls. Inside the fan, wiring connects the power source to both the fan motor and the light kit.
Main components:
- Light bulbs (LED, CFL, incandescent)
- Light sockets
- Wiring (neutral, hot, ground)
- Switches (wall, pull chain, remote)
- Light kit (the fixture attached to the fan)
Understanding these basics will help you diagnose problems more effectively.
Common Causes Of Ceiling Fan Light Failure
Several reasons can explain why your ceiling fan light is not working. Some are simple to fix, while others need more investigation.
- Burnt-Out Bulb: The most common cause. Even new bulbs can fail early due to manufacturing issues.
- Loose Bulb: If not screwed in tightly, the bulb may not make proper contact with the socket.
- Faulty Light Socket: Over time, sockets can wear out, especially if bulbs are changed often.
- Bad Light Switch or Pull Chain: A broken switch or pull chain can prevent electricity from reaching the bulb.
- Tripped Circuit Breaker: Sometimes, the breaker trips, cutting power to the fan and light.
- Wiring Problems: Loose, frayed, or disconnected wires inside the fan or junction box.
- Remote Control Issues: If your fan uses a remote, the receiver or remote could fail.
- Blown Fuse (in some fans): Some light kits have a small fuse that can blow.
- Bad Capacitor (rare): The capacitor usually controls fan speed, but in rare cases, it can affect the light.
- Incorrect Bulb Type: Some fixtures require specific types of bulbs (wattage, base size, or shape).

Credit: www.youtube.com
Quick Safety Tips Before You Start
Electricity is dangerous. Always put safety first.
- Turn off power at the circuit breaker before working on the fan or light.
- Use a non-contact voltage tester to confirm there’s no electricity.
- If you’re unsure or uncomfortable, call a licensed electrician.
- Stand on a stable ladder and keep your workspace dry.
Step-by-step Troubleshooting Guide
Let’s go through each possible cause, starting with the simplest. Work through these steps in order. Most issues can be found and fixed without special tools.
1. Check The Light Bulb
- Turn off the fan’s wall switch and let the bulb cool.
- Remove the bulb and inspect it for black spots or a broken filament.
- Test the bulb in a different lamp. If it doesn’t work, replace it.
- If it works elsewhere, try a new bulb in the fan.
Tip: Use the correct wattage and base type as recommended by the manufacturer. Using the wrong bulb can cause overheating or early failure.
2. Inspect The Bulb Socket
- Look inside the socket for corrosion, burnt marks, or debris.
- Gently bend the small metal tab at the bottom (with power off) up a bit if it looks flattened.
- If the socket is damaged, it may need replacing.
3. Test The Light Switch Or Pull Chain
- If the light is controlled by a wall switch, flip it several times. Sometimes switches fail internally.
- For pull chains, pull firmly but gently. If the chain feels stuck or loose, the switch inside may be broken.
- Wall dimmer switches can also fail or may not be compatible with LED bulbs.
4. Check The Circuit Breaker
- Go to your electrical panel and find the breaker that controls the fan.
- If it’s tripped (in the middle position), switch it fully off and then back on.
- If it trips again immediately, there may be a short circuit or wiring issue.
5. Test The Remote Control And Receiver
- Replace the remote’s batteries.
- Check if the remote works for the fan but not the light. If so, the receiver or light button may be faulty.
- Try using the wall switch or pull chain directly.
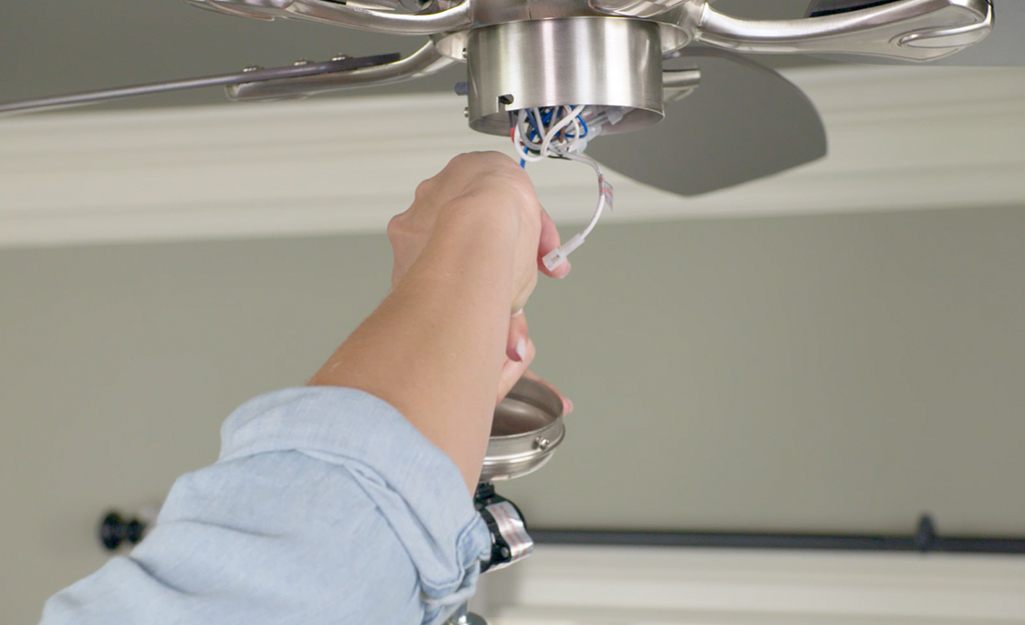
6. Examine The Fan’s Wiring
This step is more advanced. Only do this if you’re comfortable and after confirming the power is off.
- Remove the fan’s light kit cover.
- Look for loose or disconnected wires, especially where the light kit connects to the fan.
- Wires should be twisted tightly and secured with wire nuts.
- If you find burnt or melted wires, stop and call an electrician.
7. Look For A Blown Fuse (if Present)
Some ceiling fan lights have a small glass fuse inside the light kit. If the fuse is blackened or the filament is broken, replace it with the same type and rating.
8. Replace Faulty Parts
If you find a bad socket, switch, or fuse, these parts can often be replaced without replacing the whole fan. Check your fan’s manual for specific replacement steps.
Diy Repair: When And How
Many ceiling fan light issues can be fixed by homeowners, but some repairs are best left to professionals. Here’s a guide to what you can safely do yourself and when to call for help.
Safe Diy Fixes
- Changing bulbs
- Tightening loose bulbs or wire nuts
- Cleaning sockets with a dry cloth
- Replacing batteries in remotes
- Resetting circuit breakers
Repairs Requiring Extra Caution
- Replacing a light socket or pull chain switch
- Rewiring connections inside the fan
- Replacing fuses inside the light kit
Warning: If you see burnt wiring, melted plastic, or smell burning, do not continue. These are signs of electrical damage. Call a professional.
When To Call An Electrician
- You’re unsure about wiring diagrams or electrical safety.
- The breaker keeps tripping after resetting.
- There’s evidence of water damage or rust inside the fan.
- Multiple lights or outlets are not working in the room.
Understanding Ceiling Fan Light Wiring
Knowing how the wires are connected helps you identify possible issues. Here’s a simple overview of typical wiring inside a ceiling fan with a light kit.
| Wire Color | Function | Connected To |
|---|---|---|
| Black | Fan power (hot) | Wall switch or direct power |
| Blue | Light power (hot) | Wall switch, remote, or pull chain |
| White | Neutral | Main neutral wire (usually white) |
| Green/Bare | Ground | Ground wire or screw in electrical box |
If the blue (light) wire is not connected properly, the light won’t work, even if the fan spins.

Credit: diy.stackexchange.com
Different Types Of Ceiling Fan Light Controls
The way you control your ceiling fan light can affect troubleshooting. Here are the main types and common issues with each.
Wall Switch
- Simple on/off control
- Dimmer switches may not be compatible with all bulbs
- Switch failure is common with age
Pull Chain
- Often inside the fan body
- Chains can break or the internal switch can wear out
Remote Control
- Wireless receiver inside the fan
- Batteries, signal issues, or failed receivers can stop the light from working
Smart Controls
- Wi-Fi or Bluetooth enabled
- May require app updates or network troubleshooting
Tip: If you have more than one control method (for example, wall switch and remote), make sure all are set correctly. Sometimes, the light must be on at the wall before it can be controlled by remote.
Specific Problems And Solutions
Let’s look at some real-world scenarios and how to solve them.
Fan Works, Light Does Not
This usually means the motor circuit is fine, but the light circuit has a problem.
- Check the light bulb and socket first
- Make sure the pull chain or remote is set to turn the light on
- Inspect wiring to the light kit
- Look for a blown fuse in the light kit
Light Flickers Or Turns Off Randomly
This can be due to:
- Loose bulb or socket
- Incompatible dimmer switch (especially with LED bulbs)
- Fluctuating power or loose wiring
Ceiling Fan Light Won’t Turn Off
This is less common, but may happen if:
- The switch or pull chain is stuck in the on position
- Remote or receiver is malfunctioning
- Wiring is incorrect (always-on circuit)
Light Is Dim Or Buzzes
- Wrong bulb type (for example, using a CFL or LED with a non-compatible dimmer)
- Faulty socket or wiring
- Voltage issues in the home
Ceiling Fan Light Not Working After Bulb Change
If the light stops working after installing a new bulb:
- The new bulb may be defective or incompatible
- The socket could have been damaged during the change
- The breaker could have tripped from a power surge
Ceiling Fan Light Troubleshooting Data Table
Here’s a quick reference for common symptoms, causes, and solutions.
| Problem | Likely Cause | Solution |
|---|---|---|
| Light won’t turn on | Burnt bulb, bad switch, loose wiring | Check bulb, switch, wiring |
| Light flickers | Loose bulb/socket, bad dimmer | Tighten bulb, replace dimmer |
| Light stuck on | Broken switch, faulty remote | Replace switch or remote |
| Dim or buzzing light | Incompatible bulb, voltage issue | Use correct bulb, check voltage |
| Fan works, light does not | Disconnected light wire, bad fuse | Reconnect wire, replace fuse |
How To Replace A Ceiling Fan Light Kit
If your troubleshooting points to a faulty light kit (the fixture attached to the fan), you may need to replace it. This is not as difficult as it sounds, but you should always follow safety rules.
- Turn off power at the breaker.
- Remove the glass shades and bulbs from the old light kit.
- Unscrew the light kit from the fan. Usually, there are a few screws holding it in place.
- Disconnect the wires by unscrewing the wire nuts. Note the color connections.
- Attach the new light kit by connecting wires to their matching colors (usually blue to blue, white to white).
- Secure the new kit to the fan with screws.
- Install bulbs and shades.
- Turn on the power and test the light.
Tip: Take a photo of the wiring before disconnecting anything. This helps you remember where each wire goes.
Preventing Future Problems
A ceiling fan light can last many years if maintained properly. Here’s how to prevent common issues:
- Use bulbs with the correct wattage and type.
- Clean the light kit and bulbs regularly to remove dust.
- Check for loose screws or wire nuts every year.
- Avoid pulling chains too hard.
- Replace remote batteries yearly.
- Don’t overload the circuit with too many devices.
Hidden Insight: Many people don’t realize that ceiling fans installed in kitchens or bathrooms are more likely to have light problems due to humidity. Use fans rated for damp locations in these areas.
Upgrading Your Ceiling Fan Light
If you’re tired of dealing with frequent problems, consider upgrading your fan or just the light kit.
Modern Light Kits
- Use LED bulbs for energy savings and longer life.
- Some kits offer dimmable or color-changing lights.
- Smart kits can be controlled by phone or voice.
Benefits Of Upgrading
- Fewer maintenance needs
- Lower electricity bills
- Better lighting quality
Non-obvious Insight: Not all ceiling fan light kits are universal. Some only fit certain brands or models. Check compatibility before buying a replacement or upgrade.
The Importance Of Correct Bulb Selection
Bulb choice affects both performance and safety. Using the wrong type can cause flickering, overheating, or early failure.
| Bulb Type | Pros | Cons | Best For |
|---|---|---|---|
| Incandescent | Cheap, good color | Short lifespan, hot | Older fixtures |
| CFL | Energy efficient | Slow to brighten, contains mercury | Fans with open shades |
| LED | Long life, cool, efficient | May flicker with old dimmers | Most modern fans |
Tip: Always check the fan’s manual or the sticker inside the light kit for maximum wattage and approved bulb types.
Cost Of Repair Vs Replacement
How much should you spend fixing a ceiling fan light? Here’s a breakdown of typical costs:
- New bulbs: $2–$10 each
- Light socket: $5–$15
- Pull chain switch: $5–$20
- Remote/receiver kit: $20–$60
- New light kit: $25–$75
- Electrician visit: $75–$150 per hour
If your fan is old, noisy, or the repairs cost more than half the price of a new unit, consider replacing the whole fan. Newer models are more energy efficient and quieter.
Environmental Considerations
Ceiling fan lights can be more eco-friendly than you might think. Using LED bulbs reduces electricity use and heat output. If you need to dispose of old bulbs, remember:
- Incandescent bulbs can go in regular trash.
- CFLs contain mercury and should be recycled at special centers.
- LEDs last longer but can be recycled for metals and plastics.
Visit the EPA’s website for safe disposal tips. Using energy-efficient lights and recycling old parts helps reduce your environmental impact.
Professional Vs Diy: Making The Right Choice
Many homeowners fix ceiling fan lights themselves, but sometimes professional help is safer or more cost-effective. Here’s how to decide:
- DIY is fine for changing bulbs, tightening connections, or replacing a switch.
- Call a professional if you’re unsure about wiring, if the breaker keeps tripping, or if you see signs of electrical damage.
- If you live in an apartment, check with your landlord before making changes.
Non-obvious tip: Some fan warranties are voided if you do electrical repairs yourself. Check your warranty before starting.
Credit: www.homedepot.com
Where To Find Replacement Parts And Help
You can find ceiling fan light parts at most hardware stores, home improvement centers, or online. Always bring the old part or the fan’s make and model when shopping.
For more detailed technical information, visit Wikipedia.
Frequently Asked Questions
Why Does My Ceiling Fan Light Keep Burning Out Bulbs?
This could be caused by vibration from the fan, using the wrong bulb type, or a loose socket. Try using rough-service or LED bulbs, which handle vibration better. Also, check that the bulbs are screwed in tightly and the socket is clean.
Can I Use Led Bulbs In My Ceiling Fan Light?
Most modern ceiling fans accept LED bulbs, but check the manual for compatibility. If you have a dimmer switch, make sure the bulb is labeled as dimmable. Using the wrong LED can cause flickering or early failure.
What If My Fan’s Light And Fan Stopped Working At The Same Time?
If both stop, it’s usually a power supply issue—such as a tripped breaker, blown fuse, or loose connection in the ceiling box. Check the electrical panel and inspect wiring with the power off.
Do I Need An Electrician To Fix A Ceiling Fan Light?
You can fix many problems yourself, like changing bulbs or tightening connections. But if you’re not comfortable with wiring or see signs of damage, it’s safer to call a licensed electrician.
Why Does My Ceiling Fan Light Flicker When I Use The Remote?
This often happens with incompatible bulbs or a failing remote receiver. Try replacing the bulb with a different type (LED, CFL, or incandescent) and, if the problem continues, consider replacing the remote’s receiver.
A ceiling fan light that isn’t working can be frustrating, but most problems have simple solutions. With a systematic approach, you can often fix the issue yourself and restore both comfort and lighting to your home. If in doubt, don’t hesitate to seek professional help.
A safe, well-lit home is always worth the effort.