
Lanix X210 Root:- Root is a term given to the process of overriding pre-installed Android security software. Almost every Android phone comes with pre-installed security software that doesn’t allow potentially harmful or system modifier applications to be installed on their android phone. As a result of this security software, a smartphone user can’t view or browse system files stored in the operating system.
To view or modify these system files a user must root their phone applications and software. A complex coder can root their phone Android SDK software but for the users who aren’t familiar with coding, they can root their phone with one-click applications available in third-party platforms. If this is your first time rooting phone then I would recommend you follow the step by step instructions below to root your phone in just one click.
A bit about Lanix X210 before rooting
Display: 4-inch TFT LCD (480 x 800 Resolution)
Launched: 2016
Operating System: Android v5.1 Lollipop
Processor: 1.3 GHz Quad-Core
Internal Space: 8 GB
Battery: 1200 mAh (Upto 7.0 Hour of Talktime)
How to Root Lanix X210
Before following one of our methods to root your device please activate debugging mode in your smartphone.
1) Using Kingroot App
- Download and Install kingroot apk file by following the link (http://d.kingoapp.com/default/KingoRoot.apk).
- Once the app is downloaded on your smartphone tap on the app for installation.
- Before installation, the app required your permission because you are installing a custom app so when a pop-up prompt message will be appeared titled INSTALL BLOCKED just go to SETTINGS and tap on UNKNOWN SOURCE as shown in Figure.

- Now the app will begin to install, once installed open it and tap on button ONE CLICK ROOT.
- Once the process is finished your phone will be rooted. Be patient during the period of root because some can take up to 30 minutes to root and make sure your phone does not disconnect from the internet during rooting.
2) Through SRS Root
The second method to root a phone is quite bothersome because in this method you will need a USB cable and computer to root your smartphone.
- Go to the following website “http://www.srsroot.com/” and install the software on your computer by clicking on the download tab given at top of the page.
- Once installed open software and connect your smartphone via USB Cable.
- Make sure you enable USB DEBUGGING before continuing.
- Now click on the ROOT DEVICE button on the top left corner to start rooting a device.
If you are looking for more apps like Kingroot then try these out - Framaroot and Towelroot. The method of installing each app will be the same as given in Kingoroot.
In case none of the root applications works on your phone which is really rare then you can try Systemless Root.
How to Unroot Lanix X210
Just like rooting you should unroot your phone whenever you visit the customer service office to repair your smartphone or installing operating system updates on your smartphone.
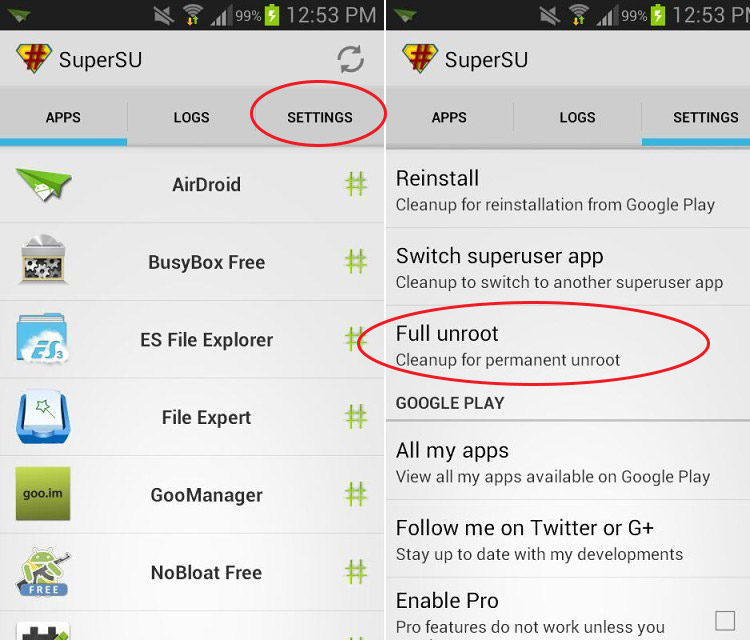
Using Supersu App
- Go To Playstore and Download Supersu App.
- Open Application and then go to settings page, scroll down and tap on FULL UNROOT.
Video Tutorial:-
Using Es File Explorer
- Go to play store and download the app ES File Explorer on your Internal Storage
- Once installed open the app and click on MENU mentioned on the top left side of the page.
- Now tap on Tools and then turn on ROOT EXPLORER.
- After turn on Root Explorer go back to the app dashboard and go back to destination “/”.
- Now go to folder SYSTEM -> BIN and delete file SU.
- Then go back to another folder SYSTEM -> XBIN and delete file SU.
- Now go back to the folder SYSTEM -> APP and then remove the SUPERUSER.APK file.
- Once the files are deleted reboot your phone, congrats your phone is unrooted.
For more information on Root and Unroot Lanix X210 stay updated with this website.
Leave a Reply